The Builder’s Playbook For Quiet Heat And Stable Planks
60 Second Summary For Ottawa Homes, Condos, And Mixed-Use Projects
Who this is for
Ottawa homeowners, renovating homeowners, condo owners, renovating condo owners and designers who want the comfort of radiant heat with a floating hardwood or laminate floor that stays quiet, flat, and beautiful.
What you will learn
• How to prep a radiant slab and confirm moisture, temperature, and RH targets
• Which underlayments work with radiant without choking heat or the click system
• Expansion rules that prevent trapped fields, squeaks, and lock failure
• A field-tested layout, conditioning, and operation plan that keeps floors stable
Result
Even warmth, calm seams, and a floor that feels solid underfoot. No winter gaps that yell, no spring cupping, no click joints surrendering at doorways.
Key Facts For Radiant + Floating Floors In Ottawa
- Company: Royal Hardwood Floors
- Who we are: Ottawa’s only third generation hardwood specialist, caring for residences, condos, embassies, and commercial spaces since 1922
- Relevant services: Radiant run-in protocols, slab moisture testing, underlayment specification, floating system installation, expansion detailing, post-install monitoring
- Service area: City of Ottawa and surrounding communities
Radiant slabs are a gift in Ottawa winters. Warmth rises evenly and clients stop talking about cold feet. Floating hardwood or laminate over that heat can perform beautifully when the assembly is disciplined. The weak links are predictable: the wrong underlayment, starved expansion, and bargain click profiles that cannot cope with seasonal movement. Use this playbook to specify it right the first time.
I. Start With The Slab, Not The Sample
Before species or plank width, confirm the substrate.
- Commission radiant heat to normal schedules at least 5 to 7 days before delivery. Record supply water temps, surface temps, and room RH.
- Measure moisture. Use in-situ RH testing for concrete and keep ambient logs. Floating is more forgiving than glue down, but a wet slab still pumps vapor that fogs edges and stresses joints.
- Stabilize the space. Target 20 to 22 °C and 35 to 45 percent RH for at least 72 hours before, during, and after install.
- Surface temperature cap. Finished floor temperatures should not exceed 27 °C. Change setpoints slowly, typically 1 to 2 °C per day, to prevent differential drying.
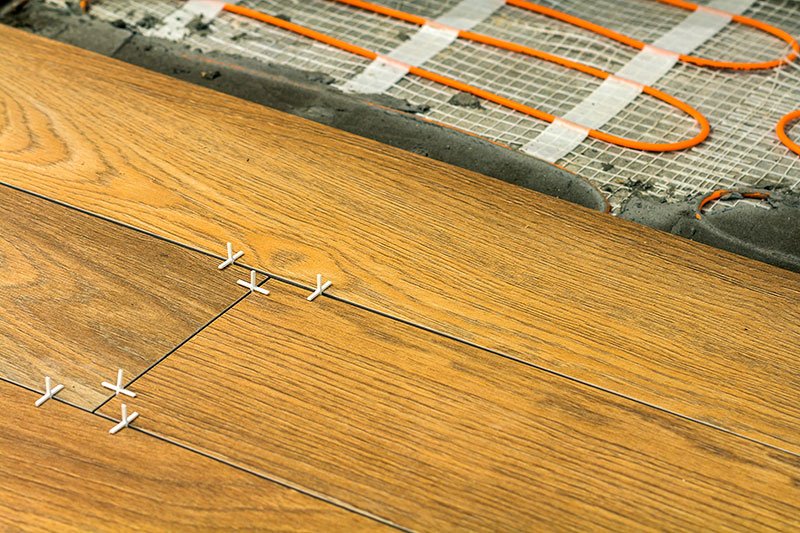
II. Underlayments: Thermal, Acoustic, And Vapor Control That Do Not Fight The Heat
Radiant comfort depends on low resistance above the tubing.
- Thermal resistance. Choose thin, dense pads engineered for radiant. Keep R-value as low as practical so heat output is not throttled. Plush foams and cork feel nice but can strangle low-temp systems.
- Vapor control. On on-grade or below-grade slabs, use 6 mil polyethylene with taped seams under the pad or a radiant-rated combo pad with an integrated retarder approved by the flooring brand. Overlap poly 200 mm, tape seams, and turn up behind base.
- Acoustics. In condos and mixed-use, meet IIC and STC targets without blowing the thermal budget. Ask for third-party reports at the installed thickness.
- Compression discipline. Avoid soft “sponges.” Excess compressibility lets the click joint flex and shear under point loads.
III. Expansion: Where Floating Floors Live Or Die
Radiant cycles more than a conventional deck. Give the field room to breathe.
- Perimeter gaps. Follow the brand minimums, often 10 to 15 mm at all fixed verticals, including posts, hearths, stair newels, and kitchen islands. Base and shoe hide the gap.
- Break long runs. Use T-molds at doorways and transitions when the manufacturer’s maximum run length is exceeded or where geometry changes. Never pin a floating field by fastening a reducer through the plank.
- Appliances and islands. Do not trap a floating field under fixed cabinetry or islands. Install floors after cabinetry or isolate islands with a hidden movement joint behind toe-kicks.
IV. Click-Lock Quality: Profiles That Survive Radiant Movement
Not all click is equal. Cheap geometry unzips under cycling.
- Core density. Specify higher-density HDF or engineered cores with tight tolerances. Ask mills for density specs and tolerance ranges.
- Modern profiles. Prefer 5G-style or equivalent locks that secure vertically and horizontally. Loose tongue-and-groove “click” will chatter and open.
- Edge treatment. Waxed or factory-sealed clicks resist seasonal humidity swings. Avoid raw fuzzy edges that turn into lint lines by February.
- Board design. Longer, well-balanced engineered planks with quality cross-plies behave better. Very wide, very thin laminates magnify movement problems.
- On-site test. Dry-fit four courses. If a gentle heel twist opens a joint, choose another product for radiant work.
V. Conditioning And Acclimation That Reflect Radiant Reality
Treat the wood and the space as a system.
- Condition sealed. Bring pallets inside and keep cartons closed 24 to 48 hours so core temperature matches the room. Opening cold cartons creates false low readings and condensation risk.
- Acclimate to operating conditions. After conditioning, open cartons and stage material in the install rooms with radiant running. When daily MC readings stabilize and RH holds, proceed.
VI. Layout And Details That Keep The Field Quiet
- Start lines. Snap dead-straight, square references along the dominant wall. A tiny skew at row one becomes visible gaps at row ten.
- Stagger logic. Follow the brand’s minimum end-joint offsets. Short, repeating patterns concentrate stress. Vary offsets for a calmer field.
- Door frames and trim. Undercut casings so planks slide freely. Never notch around trim and caulk tight. That traps movement at the worst spot.
- Perimeter backer. In high-movement zones, place a thin foam backer in the gap to prevent visible voids while preserving expansion behind base.
VII. Radiant Operation During And After Install
- Pre-install. Run radiant normally. Do not use high-temp boost modes to “speed things up.”
- Install day. Hold temperature steady. Sudden setbacks create pressure differentials that open green joints.
- Post-install. Maintain steady conditions for 48 hours, then resume normal schedules. If finishing adjacent rooms, confirm allowable surface temperatures with the coating manufacturer.
VIII. Rugs, Pads, And Furniture That Respect The System
- Rugs. Avoid thick rubber-backed rugs that trap heat and create hot spots. Use breathable pads and check surface temperature under rugs during the first heating season.
- Furniture. Use wide felt glides, not sharp points. Do not anchor heavy bookcases or islands through the floating field.
- Office chairs. Specify soft casters and consider a breathable chair mat to spread load without sealing heat.
IX. Monitoring And Documentation Builders Can Hand Off
Make performance visible for owners and condo boards.
- Place small data loggers for the first heating season to record RH and temperature.
- Supply a one-page operation card with the 27 °C surface cap, the 35 to 45 percent RH target, and the recommended setpoint ramp rate.
- Record slab RH test results, underlayment brand and R-value, and exact movement breaks on the as-built plan.
X. Troubleshooting: Quick Causes And Fixes
- Gaps by February mornings. Usually low RH. Verify 30 percent or lower, then add humidification to reach 35 to 40 percent.
- Click joints creak near an island. Field is trapped. Introduce a hidden movement joint behind the toe-kick and relieve fastened trims.
- Warm rooms, cool floors. Underlayment too resistive or rugs blocking heat. Replace pad in a test room with a radiant-rated low-R pad and reassess output.
- Edge sheen haze. Moisture drive from a green slab. Improve vapor control and ventilation. Confirm in-situ slab RH and correct before cosmetic fixes.
- Crowning under rugs. Local heat buildup. Swap to breathable pads and confirm surface temperature stays under 27 °C.
XI. Spec Checklist For Radiant Floating Floors
• Slab conditioned and run in 5 to 7 days before delivery
• In-situ slab RH recorded, room RH 35 to 45 percent, air 20 to 22 °C
• Low-R radiant-rated underlayment, verified IIC and STC if required
• 6 mil poly with taped seams on on-grade or below-grade concrete unless the pad integrates a rated retarder
• Click system with high-density core and 5G-style lock
• Perimeter gaps 10 to 15 mm, breaks at long runs and geometry changes
• Door casings undercut, trims not pinning the field
• Operation card: 27 °C surface cap, slow setpoint changes, RH target
• Data loggers placed and handoff documents delivered
XII. Why Royal Hardwood Floors
Since 1922 our family has installed and protected Ottawa floors through long winters. We commission radiant, test slabs, specify underlayments that pass both the thermal and acoustic tests, and build floating assemblies that move quietly through the seasons. The result is warm comfort, stable seams, and a floor that belongs in modern life.
FAQs
Is floating flooring compatible with radiant heat?
Yes. When slab moisture, underlayment, expansion, and operating temperatures are controlled, floating hardwood and laminate perform very well over radiant heat.
What is the maximum safe temperature for radiant floors?
Surface temperature should not exceed 27 °C. Increase or decrease setpoints slowly, ideally 1–2 °C per day.
Do I need vapor protection under floating floors on concrete?
Yes. Use 6 mil poly with taped seams under the underlayment, unless the chosen pad includes a radiant-rated vapor retarder approved by the flooring brand.
Why do floating floors gap in winter?
Low indoor RH (often under 30 percent) dries the boards and contracts the click joints. Maintain 35–45 percent RH for stable seams.
What underlayment should I use with radiant heat?
A thin, dense, radiant-rated underlayment with low thermal resistance. Avoid plush foams or cork that restrict heat flow or overstress the click joints.
Should floating floors run under kitchen islands?
No. Fixed islands trap the floating field and cause buckling. Install floors after cabinetry or isolate islands with a hidden movement joint.
Why do click joints fail over radiant?
Cheap profiles, soft cores, or insufficient expansion gaps allow cycling stress to unzip the joint. Use high-density cores and modern 5G-style locks.
How long should flooring acclimate over radiant?
Condition sealed cartons 24–48 hours, then acclimate opened cartons at operating temperature until readings stabilize and RH is steady.
Are rugs safe on radiant floating floors?
Use breathable pads only. Avoid thick rubber or foam pads that trap heat and cause localized cupping.
What documentation should builders give owners?
Slab RH test data, underlayment specs, movement joint locations, radiant operation card, surface temperature limits, and first-season RH targets.
Book A Radiant Floating Floor Spec Review
We will review your slab data, underlayment options, click profile, expansion plan, and operation settings, then deliver a clear specification and handoff package that keeps your radiant project warm, quiet, and stable for years.
Serving Ottawa since 1922 as the only third-generation hardwood specialist in the region.